Discover how to boost chatbots with OpenAI’s GPT-3 and Laravel. Learn about vector embeddings and how giving a URL to your chatbot lets you ask questions about the page, making interactions smarter and easier to handle.
OpenAI’s GPT model, is super smart, but its last update? September 2021. That might not sound like a long time ago, but in the tech world, it’s an eternity! Just think about it: if you were to chat with ChatGPT and ask about the latest OpenAI package for Laravel, it’d give you a puzzled digital look. It’s just not in the know about that yet. It’s a good reminder that even the most advanced tools have their limits and need a bit of help catching up sometimes.
In this post you will:
Learn about Embeddings and Vector Similarity: We’ll be explore embedding and vector similarity, which help improve our chatbot’s understanding.
Implement a real chatbot use case: You’ll be implementing a feature in a Laravel application where users can submit URLs. The chatbot will then process the content of these URLs using NLP to understand context and content, and respond appropriately.
Embeddings and Vector Similarity
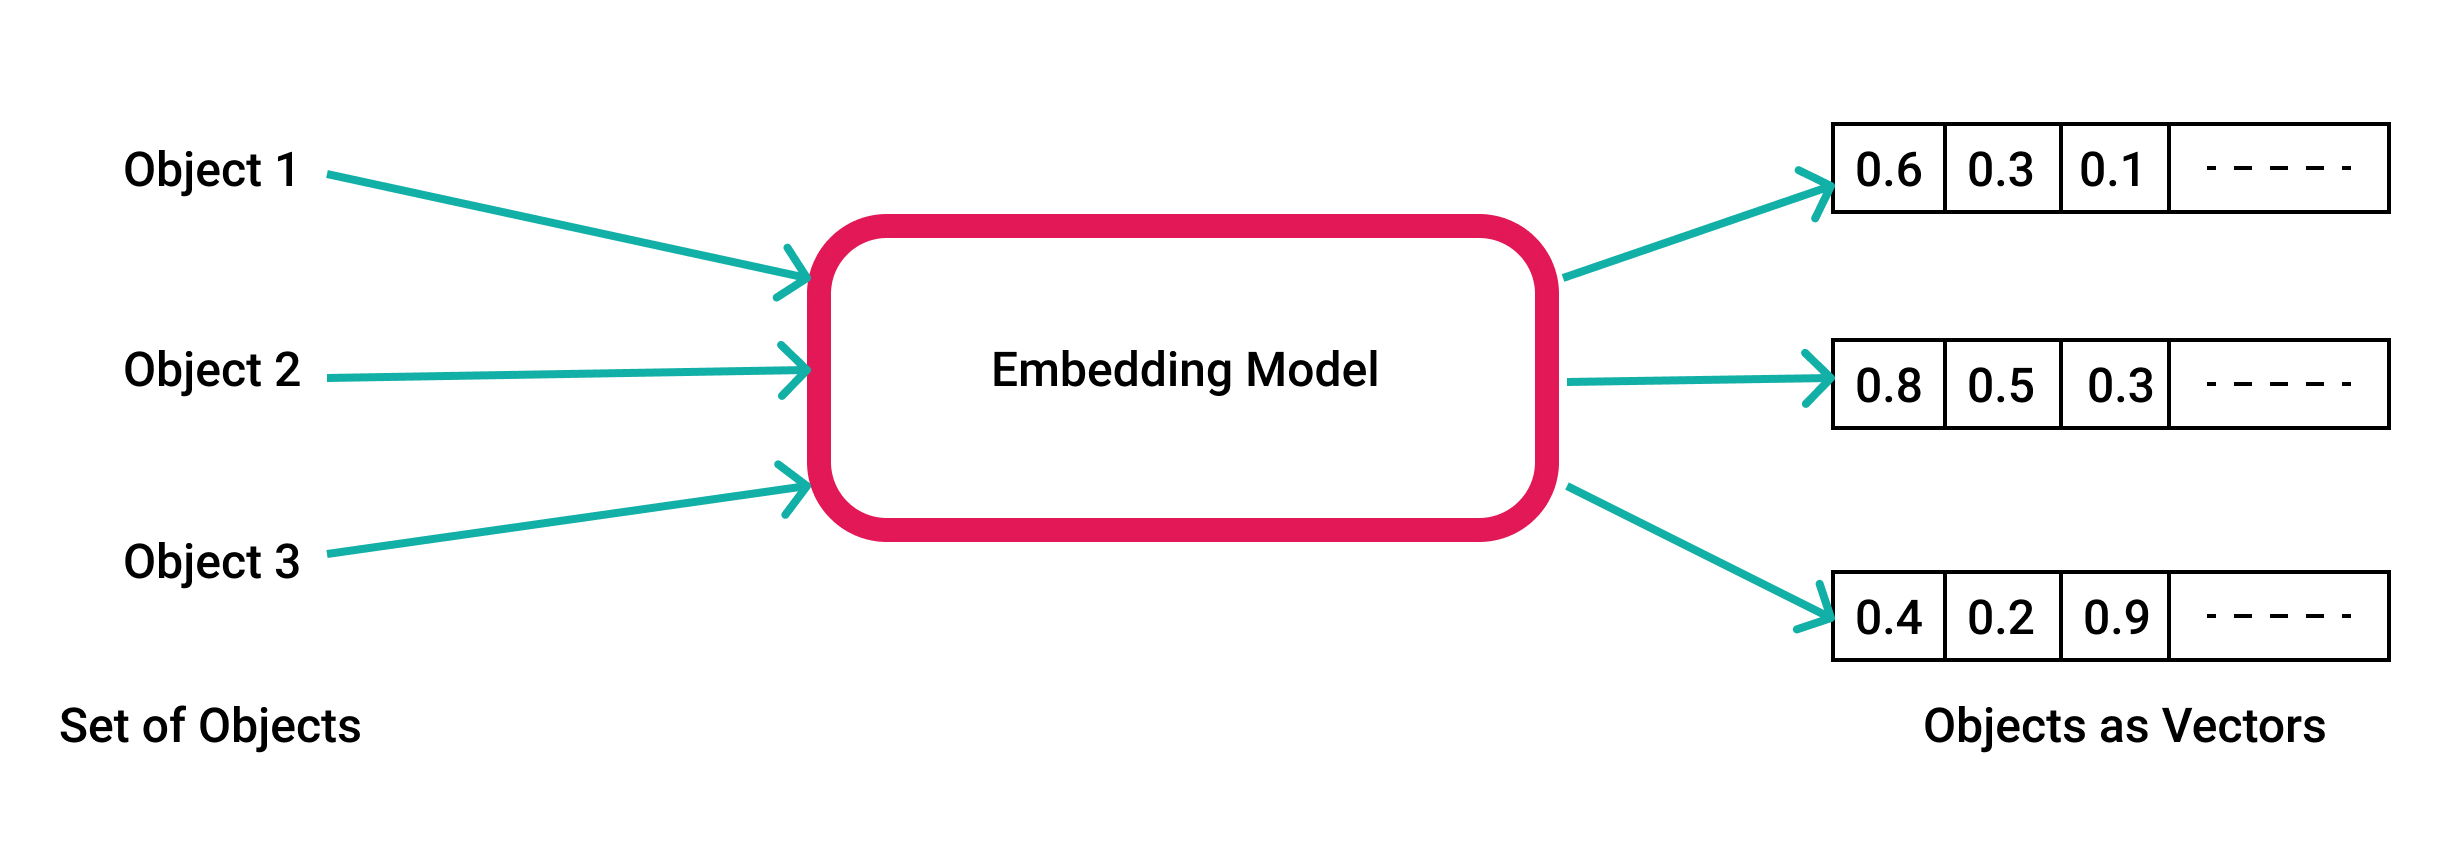
Embedding, in the context of machine learning and natural language processing, refers to the conversion of data (usually words or phrases) into vectors of real numbers. These vectors represent the data in a way that a machine can understand, process, and utilize.
Tokenization: The first step in the embedding process often involves breaking down a piece of text into smaller units, called tokens. These tokens can be as short as a single character or as long as a word.
Vector Representation: Each token is then mapped to a vector in a predefined vector space. This mapping is done using algorithms that ensure semantically similar words are placed closer together in the vector space.
Dimensionality: The vector space can be of any dimension, but for practical purposes and computational efficiency, we often reduce the number of dimensions using techniques like Principal Component Analysis (PCA) or t-SNE. Despite the reduction in dimensions, the relative distances (or similarities) between vectors are preserved.
Vector Similarity
Vector similarity is a measure of the closeness or similarity between two vectors. It helps in determining how alike two pieces of data are. The more similar the vectors, the more similar the data they represent.
Cosine Similarity: One of the most common ways to measure vector similarity. It calculates the cosine of the angle between two vectors. A value of 1 means the vectors are identical, while a value of 0 means they’re orthogonal (or not similar at all).
Euclidean Distance: Another method where the similarity is determined based on the “distance” between two vectors. The closer they are, the more similar they’re considered to be.
Dot Product: If the vectors are normalized, taking the dot product of two vectors will give a value between -1 and 1, which can also be a measure of similarity.
Imagine we’re using a 3-dimensional space to represent our words. Here’s a hypothetical representation:
Word Embeddings:
Cat: [0.9, 0.8, 0.1]
Dog: [0.8, 0.9, 0.05]
Computer: [0.2, 0.1, 0.95]
In this representation:
The vectors for “cat” and “dog” are close to each other, indicating they are semantically similar. This is because they are both animals and share certain characteristics.
The vector for “computer”, on the other hand, is farther from the vectors of “cat” and “dog”, indicating it is semantically different from them.
If we were to visualize this in a 3D space:
“Cat” and “dog” might be near each other in one corner, while “computer” would be on the opposite side or in a different corner of the space.
Understanding Similarity:
Using cosine similarity:
The similarity between “cat” and “dog” would be high (close to 1) because their vectors are close.
The similarity between “cat” and “computer” or “dog” and “computer” would be much lower (closer to 0) because their vectors are farther apart.
Remember, this is a very simplified representation. In real-world applications, the dimensions are much higher (often in the hundreds or thousands), and the vectors are derived from vast amounts of data to capture intricate semantic relationships.
Implement a real use case
Our primary tool for storing vectors will be Pine code. However, you can also use pg vector and the underlying mechanics of vector similarity will be essential to grasp the full potential of our chatbot. And to further elevate its capabilities, we’ll introduce web scraping. This ensures our bot is aware with information about a webpage, making it capable at answering queries related to that page.
Here you can see what we will acomplish with our implementation:
The first step is:
User submits a web link.
Backend Service receives the link.
Crawler visits the link.
Data Processing occurs:
Converts content using a Markdown Converter.
Tokenizes content.
Store the processed vector to the database.
Then once we have crawled the web page we will see a chat, where you can ask question about that page.
Question from user is vectorized.
Search for similarities in vector database (Pinecode).
Results sent to OpenAI for context.
OpenAI’s Embedding API processes data.
The AI responds to the user
Here is a video of the end result.
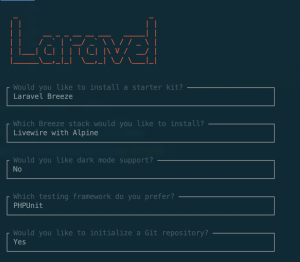
Let’s create new laravel project, we will name it aichat.
1
2
laravel newaichat
Select laravel breeze with livewire and alpine so we have livewire to make a our chat and tailwind css installed for making it easy to create our chat UI.
Creating a section for setting up a Pinecone account and obtaining the necessary variables in a Laravel PHP project can be structured as follows:
1. Create a Free Pinecone Account:
– Visit the Pinecone Website
– Click on “Get Started” or “Sign Up” to create a free account.
– Follow the on-screen instructions to complete the registration.
– Once you create your index create the index using a vector dimension of 1536 and the rest can be standard.
2. Obtain Your Pinecone API Key and Environment Variable:
– Once logged in, navigate to your account settings or dashboard.
– Look for a section titled “API Keys” or “Credentials”.
– Generate a new API key and note down the environment variable associated with your account (usually it’s a string like production or development).
3. Setup Pinecone Variables in Your Laravel Project:
– In your Laravel project, open or create a .env file in the root directory.
– Add the following lines to your .env file, replacing YOUR_API_KEY and YOUR_ENVIRONMENT with the values obtained from your Pinecone account:
1
2
PINECONE_API_KEY=YOUR_API_KEY
PINECONE_ENVIRONMENT=YOUR_ENVIRONMENT
4. Add a pinecone.php in the config directory:
– Now in your Laravel PHP code, you can access these variables using the env() function as shown below:
pincone.php //config
PHP
1
2
3
4
5
6
<?php
return[
'api_key'=>env('PINECONE_API_KEY'),
'environment'=>env('PINECONE_ENVIRONMENT'),
];
5. Initialize Pinecone:
– You can now initialize Pinecone using the obtained credentials. While Pinecone’s documentation primarily shows initialization in Python or JavaScript, you would need to look for a PHP library or create a wrapper around Pinecone’s API to interact with it in PHP.
PHP
1
2
3
4
$pinecone=newPinecone(
config('pinecone.api_key'),
config('pinecone.environment')
);
Install readability package for php this will help us generate sanitized html.
1
composer require fivefilters/readability.php
To begin developing the UI, simply run npm run dev. Once you have completed the development process, be sure to execute npm run build in order to generate all the necessary CSS and JS files.
Collecting Data
Now that our project is ready we can start creating helper class to collecting data that we will embed. Before we start lto create an account in browserless to get info from the webpage and get the html. You can do this also with the laravel HTTP client, but some pages are not SSR loaded. You can replace it just with laravel HTTP client if you want.
Setting Up Your Browserless Account
Browserless is a service that allows for browser automation and web scraping in a serverless environment. To use Browserless, you’ll need to set up an account and obtain a unique BROWSERLESS_KEY. Here’s how to do it:
1. Create a Free Browserless Account:
– Visit the Browserless Website
– Click on “Start for Free” or “Sign Up” to create a free account.
– Follow the on-screen instructions to complete the registration.
2. Obtain Your Browserless API Key:
– Once logged in, navigate to your account settings or dashboard.
– Look for a section titled “API Keys” or “Credentials”.
– Generate a new API key, which will be your BROWSERLESS_KEY.
Here’s a simplified breakdown of what this class does:
Fetching Web Content:
– The handle method is triggered with a URL as its argument.
– It sends a HTTP POST request to a web browsing automation service (browserless) to load the specified web page. Alternatively, it can send a plain HTTP GET request if web browsing automation is not needed.
Processing Web Content:
– Utilizes the Readability library to parse the fetched web page, isolating the main content and stripping away html elements.
Preparing Content:
– The script cleans up the text by removing HTML tags and splits it into chunks of up to 1000 characters each, ensuring the last chunk is at least 500 characters long by merging it with the previous chunk if necessary.
Text Embedding:
– Sends the processed text chunks to OpenAI’s service to generate text embeddings, which are compact numerical representations of the text in vectors. Just like we saw earlier.
Indexing Embeddings:
– Clears any previous embeddings indexed under the ‘web’ namespace for the ‘chatbot’ index in Pinecone, a vector database.
– Then, it indexes the new embeddings in Pinecone, associating each embedding with a unique ID based on the URL and chunk index, and storing the original text and URL as metadata.
This way, the script facilitates the automated retrieval, processing, and indexing of web content, making it searchable and usable for a chatbot.
This way if the chatbot returns code, it show a code block in black.
Creating a class for managing a conversion with Open AI
We are going to create a class that will manage chat messages and go to the Open AI API, we will be using the stream response because we want the same behaviour as we have today with chatgpt, we don’t want to wait until the whole message is finished.
ChatMessages.php
PHP
1
2
3
4
5
6
7
8
9
10
11
12
13
14
15
16
17
18
19
20
21
22
23
24
25
26
27
28
29
30
31
32
33
34
35
36
37
38
39
40
41
42
43
44
45
46
<?php
namespaceApp;
useIlluminate\Mail\Markdown;
useOpenAI\Laravel\Facades\OpenAI;
classChatMessages
{
publicfunctionhandle(
array$messages,
callable$finishedHandler,
callable$streamHandler=null,
)
{
$stream=OpenAI::chat()->createStreamed([
'model'=>'gpt-3.5-turbo',
'messages'=>$messages,
]);
$content='';
foreach($streamas$response){
$delta=$response->choices[0]->delta->content;
if(empty($delta)){
continue;
}
$content.=$delta;
$streamHandler(
//Render markdown
Markdown::parse($content)->toHtml()
);
}
$finishedHandler(
Markdown::parse($content)->toHtml()
);
}
}
The class ChatMessages will handle chat interactions with OpenAI. The handle method is the heart of this class, taking in chat messages and two handlers for processing the chat as it streams from OpenAI’s GPT-3.5 Turbo model.
Upon calling handle, a streamed chat with OpenAI is initiated using the provided messages. As responses come in from OpenAI, they are looped through and the new content is appended to a content string. If a streamHandler is provided, it’s called with the updated content rendered to HTML, allowing for real-time updates.
Once all messages have been processed, the finishedHandler is called with the full content also rendered to HTML, signaling the end of the chat processing. This setup allows for both real-time processing of chat messages as they come in and a final handling step once all messages have been processed.
This will be used in our ChatBot.php class
Not let’s go trough the ChatBot.php class in livewire.
Let’s add some properties.
PHP
1
2
3
4
5
6
7
8
9
public$prompt='';
public$answer='';
public$pending=false;
public$conversation=[];
public$step='url';
1
2
#[Rule('required|min:3|url')]
public$url='';
The prompt will what user types for asking questions.
The answer property will be the current answer the chatbot is streaming once we go to open ai. We will be using wire:stream to stream the response to the front end.
Pending is a boolean so we now the AI is streaming a response and we are waiting it to finish.
Conversions array will be used to save our chat messages.
And the step property will help us giving a step to add the URL and after entering the URL we will show the chat UI.
The url will be the url we want the scrap. This will be validated to be required and have a valid url.
1
2
3
4
5
6
publicfunctionsubmitUrl()
{
$this->validateOnly('url');
(newEmbedWeb())->handle($this->url);
$this->step='chat';
}
The submitUrl method validates the url property, processes it using the EmbedWeb class explained in a previous snippet, and transitions to a chat step by updating the step property to 'chat'.
'Base your answer the info given of the url. Only respond with the info I give you. Here are some snippets of the url from that may help you answer: %s',
The submitPrompt method is designed to process a user’s prompt, find relevant information from previously indexed web content, and prepare for a chat interaction based on the information retrieved.
An instance of the Pinecone vector database client is created.
The user’s prompt is sent to OpenAI to obtain a text embedding.
A query is made to Pinecone to find the top 4 most relevant snippets of web content based on the text embedding.
A system message is prepared with these snippets, instructing to base the answer on the given info.
The conversation array is updated with the system message and the user’s prompt.
The user prompt input field is cleared ($this->prompt = '').
A flag ($this->pending) is set to true, indicating a pending action so we can show the user some indication that the chatbot is responding.
A JavaScript function ask is triggered via the Livewire $wire object, so what this will do is that is it will refresh the UI the new messages and the current state, and on the front end it will go back to the server to start sending everything to Open AI.
Let’s create the ask method in livewire:
PHP
1
2
3
4
5
6
7
8
9
10
11
12
13
14
15
16
17
18
19
20
21
22
23
functionask()
{
(newChatMessages())
->handle(
messages:$this->conversation,
finishedHandler:function($content){
$this->conversation[]=[
'role'=>'assistant',
'content'=>$content,
];
$this->answer='';
$this->pending=false;
},
streamHandler:function($content){
$this->stream(
to:'answer',
content:$content,
replace:true,
);
},
);
}
The ask method orchestrates a chat interaction by handling incoming messages, generating responses, and managing real-time updates to the UI.
Creating Chat Handler:
An instance of ChatMessages is created and its handle method is called with the current conversation as an argument.
Handling Finished Responses:
When the handle method finishes processing, it triggers the finishedHandler callback function.
A new message from the ‘assistant’ is appended to the conversation array, containing the generated content.
The answer property is cleared, and pending is set to false, indicating that processing is complete.
Handling Streamed Responses:
If there are streamed updates during processing (like real-time typing indicators or partial responses), the streamHandler callback is triggered.
These updates are streamed to the ‘answer’ component on the frontend, replacing any previous content, providing a dynamic, real-time interaction experience.
We use the wire:stream functionality livewire gives us. This makes our so much easier, before livewire 3.0 what we did was actually using websockets to have the message update in realtime. Having the stream functionality makes our life so much easier without having the need of installing websockets.
The method facilitates a structured chat interaction, handling real-time updates, and appending final responses to the conversation, readying the system for the next user input.
The interface is split into two main sections: the chat display area and the message input area.
In the chat display area:
Messages from the ‘assistant’ and ‘user’ are iterated over and displayed with different stylings for easy differentiation.
If there’s a pending response (indicated by the $pending variable), a placeholder is displayed until the actual response ($answer) is received and displayed with the wire:stream functionality.
Livewire’s wire:stream directive is used to update the answer area in real-time as new content is streamed from the server.
In the message input area:
Users can type their message into a text input field.
Pressing the Enter key or clicking the “Send” button triggers the submitPrompt method, sending the user’s message for processing.
Any validation errors for the prompt input are displayed just below the input field.
Now you can ask questions about the webpage you gave, like we showed in the video earlier on.
Conclusion
In this journey, we’ve creatively integated OpenAI, Laravel, and Pinecone to give our chatbot a significant boost and extra knowledge. It all started with our EmbedWeb class, a tool that will do some scrapping and will get the web for content, embeds it, and saves it in Pinecone, our chosen vector database. This step automated the work of data gathering and set the stage for the chatbot to work its magic.
Then came the ChatMessages class, that is in charge of handling the conversation flow. It will stream the response so we can
And then, we rolled up our sleeves for the heart of our project – the chatbot code. With a blend of structured logic and innovative coding, we crafted a setup that takes user prompts, sifts through the indexed web content, and engages in a meaningful back-and-forth with the user. The cherry on top? Real-time updates and a sleek UI, courtesy of Laravel’s Livewire and Tailwind CSS, which made the chat interface not only functional but a delight to interact with.
What we have now is a testament to the magic that happens when OpenAI’s text embeddings, Laravel’s robust framework, and Pinecone’s vector database come together. This fusion not only amped up our chatbot’s understanding but also its ability to dish out relevant, timely responses. As we wrap up, we’re not just left with a solid piece of work, but a stepping stone towards more intuitive and engaging chatbot interactions. The road ahead is exciting, and the possibilities, endless.
Understanding React’s Virtual DOM: A Key to Performance Optimization
By Krishna Desai
React is a popular JavaScript library developed by Facebook that has revolutionized the way we build user interfaces for web applications. One of the core features that sets React apart from other frameworks is its use of the Virtual DOM, an efficient mechanism that helps optimize performance and improve the user experience. To understand why this concept is crucial for React and modern web development, it's important to first understand what the DOM (Document Object Model) is and how it works.
What is the DOM?
The DOM is essentially a representation of the web page, structured as a tree of elements (like HTML tags). Every time a change occurs in the UI (such as a button click or form submission), the browser must update the DOM to reflect the new state of the page. However, frequent updates to the DOM can be costly in terms of performance, particularly when the page is large and complex.
In traditional web development, when the DOM is updated, the browser has to go through several steps: re-render the page, recalculate styles, and reflow or repaint the elements. For larger, dynamic applications, this can lead to a noticeable lag or delay in how the application responds to user interactions.
Enter the Virtual DOM
The Virtual DOM (VDOM) is a lightweight copy of the actual DOM. It exists entirely in memory and allows React to perform most of its work before making any changes to the real DOM. Instead of updating the actual DOM every time there’s a change in the state of the application, React first makes the change in the Virtual DOM. Once the update is complete, React compares the new Virtual DOM with the previous version, calculating the minimal set of changes that need to be made to the real DOM.
This process is known as reconciliation. The idea is to minimize the number of updates to the real DOM by batching changes and applying them in an optimized way. The goal is to keep the user interface responsive and fast, even for complex, data-driven applications.
How Does React's Virtual DOM Work?
Here’s a step-by-step breakdown of how React’s Virtual DOM works:
Initial Render: When the application is first loaded, React creates a Virtual DOM that mirrors the structure of the real DOM, which reflects the HTML of the page.
State Changes: When an event occurs (like user input or an API call), the component's state changes. React then updates the Virtual DOM to reflect the new state.
Diffing: React compares the new Virtual DOM with the old one to identify what has changed. This comparison process is known as "diffing."
Reconciliation: Based on the diffing algorithm, React calculates the most efficient way to update the real DOM. Instead of re-rendering the entire page, React only updates the parts of the DOM that have changed, reducing the work required by the browser.
Update the Real DOM: Finally, the necessary updates are applied to the real DOM. Since only the changed parts are updated, this process is far faster than a full re-render.
The Benefits of the Virtual DOM
There are several significant benefits to using the Virtual DOM in React:
Performance: By reducing the number of direct updates to the real DOM, React minimizes the computational cost of rendering a page. The Virtual DOM allows React to perform updates more efficiently, resulting in faster rendering times and a smoother user experience.
Predictability: Because React’s Virtual DOM operates on a declarative model, developers only need to describe how the UI should look for a given state. React handles the underlying updates, making the development process more predictable and easier to manage.
Cross-Platform Compatibility: The Virtual DOM abstracts the underlying details of the platform it is running on, which makes React applications highly portable. This means React code can be used for web applications, mobile apps (via React Native), and even desktop applications, with minimal changes.
Improved Debugging: The Virtual DOM's predictable behavior makes it easier to debug issues. React’s component-based architecture allows developers to isolate problems to specific parts of the UI, which can help them troubleshoot and fix issues faster.
Virtual DOM vs Real DOM: A Comparison
Let’s compare how the Real DOM and Virtual DOM work side by side:
Feature
Real DOM
Virtual DOM
Speed
Slow due to frequent updates
Fast due to fewer updates to the real DOM
Memory Consumption
Higher, because of frequent reflows
Lower, as changes are first made in memory
Update Process
Direct manipulation of the DOM
Efficient update with diffing and reconciliation
Efficiency
Less efficient in complex applications
Highly efficient, especially for large UI
React’s approach to managing DOM updates is especially helpful in large-scale applications where performance can be a concern. For example, in applications with complex user interactions or those that require frequent data updates—such as social media feeds, financial dashboards, or collaborative tools—the Virtual DOM makes a noticeable difference in responsiveness and user satisfaction.
Conclusion
In conclusion, the Virtual DOM is one of the key innovations that make React such an effective tool for building dynamic, high-performance user interfaces. By using the Virtual DOM to minimize direct updates to the real DOM, React enables smoother rendering, faster performance, and a more efficient development workflow. As web applications continue to grow in complexity, React’s Virtual DOM will likely remain one of the primary reasons why React is favored by many developers around the world.
GitHub Copilot: Revolutionizing Programmer Productivity and Efficiency By Nilesh Patel
In the fast-evolving landscape of software development, keeping up with tight deadlines and complex project requirements is always a challenge for programmers. GitHub Copilot, a cutting-edge AI-powered tool, is transforming the way code is written by providing real-time assistance that makes programming faster, more efficient, and more intuitive. This intelligent software solution goes beyond simple code suggestions—it is like pairing with a supercharged copilot who understands nuances and provides smart code completions.
GitHub Copilot is powered by OpenAI's large language model, Codex, which is trained on a diverse range of code and natural language data. This allows the tool to understand context and provide relevant suggestions that are syntactically correct and logically sound. What sets GitHub Copilot apart is its ability to adapt and learn from the programmer's coding style, making its recommendations more personalized and accurate over time.
One of the primary ways GitHub Copilot enhances productivity is through its advanced autocompletion feature. As developers write code, Copilot suggests entire lines or blocks of code that can be instantly accepted or modified. This not only speeds up the coding process but also reduces the likelihood of syntax errors and common coding mistakes. The AI understands a range of programming languages and frameworks, ensuring that regardless of the development environment, the programmer receives intelligent support.
Moreover, GitHub Copilot acts as a valuable learning and discovery tool. Programmers can explore new libraries and frameworks without constantly switching context to search for documentation or examples online. For instance, when using a new software library, Copilot can suggest methods and parameters from the library, helping the programmer understand how to use it in real-time. This aspect of Copilot not only saves time but also expands the programmer's toolkit by providing hands-on learning through coding.
Beyond coding, GitHub Copilot offers capabilities that can boost efficiency in other areas, such as unit testing. Often seen as a crucial but time-consuming part of development, writing tests can be streamlined with Copilot’s assistance. It can generate test cases by understanding the intent of the code, ensuring higher code quality and reliability while saving precious development time.
GitHub Copilot also promotes best practices in code writing. By suggesting optimized and elegant solutions, it guides programmers towards more efficient coding patterns. For junior developers, this can be a critical learning tool, reducing the learning curve and helping them understand high-level coding standards and practices.
For team collaboration, GitHub Copilot can be a game-changer. Teams working on shared codebases can achieve consistency in coding standards and practices through the suggestions made by Copilot. It acts as a real-time, automated code review tool, providing insights and suggestions that can help maintain code quality across the team’s output.
However, it's important to mention that while GitHub Copilot can dramatically enhance productivity, it is designed to be a tool of assistance rather than a complete replacement for human judgment and expertise. Programmers need to review the code suggested by Copilot, making adjustments as needed to fit their specific project requirements. This hybrid approach ensures that the benefits of AI are harnessed effectively while maintaining full control over the code being written.
In conclusion, GitHub Copilot is not just revolutionizing the programming workflow by reducing manual effort and speeding up the development process—it is also helping programmers learn faster, code more efficiently, and maintain higher standards of code quality. As artificial intelligence continues to make strides in software development, GitHub Copilot stands out as a powerful ally for any programmer looking to enhance productivity and efficiency in their coding practices. Whether you are a seasoned programmer looking to optimize your workflow or a novice eager to accelerate your learning curve, GitHub Copilot offers an array of benefits that can transform the way you code.
The technology industry has long struggled with talent shortages, but in recent years, a new set of challenges has emerged: cheating, AI-assisted dishonesty, and fraudulent profiles in hiring processes. As companies strive to find skilled professionals, they face increasing difficulties distinguishing real talent from those who manipulate the system.
The Rise of AI-Assisted Cheating
With the advancement of AI tools like ChatGPT and GitHub Copilot, candidates can generate code solutions in seconds, making traditional coding assessments less reliable. Many applicants use these tools to pass automated tests, even if they lack the fundamental understanding required for the job. While AI can be a powerful assistant, it also enables dishonest practices that make it difficult for the hiring team to assess real problem-solving skills.
Some companies have started implementing AI-detection software, but distinguishing AI-generated code from human-written solutions is not always straightforward. The rise of AI-aided cheating has forced organizations to rethink technical assessments, favoring live coding interviews or supervised problem-solving sessions.
Fake Profiles and Identity Fraud in Hiring
Another alarming trend is the increase in fraudulent job applications. Some candidates create entirely fake resumes, claiming expertise in multiple technologies and listing fabricated job experiences. In extreme cases, hiring scams involve candidates using stand-ins to take technical interviews on their behalf.
Remote hiring has further complicated identity verification. Some fraudsters use deepfake technology to alter their appearance during video interviews, making it even harder for recruiters to confirm an applicant’s identity. To counteract this, many companies are now enforcing stricter identity verification measures, such as requiring candidates to turn on their cameras during coding assessments and conducting in-depth background checks.
Plagiarism in Assessments and the Decline of Traditional Testing
Online coding platforms like LeetCode, GitHub, and Stack Overflow provide valuable learning resources, but they have also made it easier for candidates to plagiarize solutions. Some job seekers memorize commonly asked coding problems and regurgitate them during interviews, making it challenging for hiring teams to assess original problem-solving abilities.
To combat this, organizations are shifting toward customized problem statements and real-world case studies that cannot be easily found online. Additionally, some companies including Konnect Way, are investing in behavioral interviews and team-based problem-solving exercises to evaluate a candidate’s ability to collaborate and think critically.
The Overuse of AI in Resume Writing
AI-powered tools allow candidates to generate polished resumes, often exaggerating skills and experience. While these tools help job seekers present themselves professionally, they also create challenges for recruiters who must differentiate between genuinely skilled applicants and those who merely have well-crafted resumes.
Many companies now cross-check resumes with live technical discussions to verify a candidate’s true knowledge. Some are also leveraging AI to analyze candidate responses for consistency throughout the hiring process.
The Future of Hiring: Adapting to the New Reality
To address these challenges, tech companies must rethink their hiring strategies. Some best practices suggested by Konnect Way include:
Live coding assessments: Conducting real-time problem-solving sessions rather than relying on pre-recorded tests.
AI-detection tools: Using software to detect AI-generated answers and plagiarism.
Identity verification: Implementing stricter measures such as multi-step verification and background checks.
Behavioral and soft skills assessments: Evaluating candidates beyond just technical skills to understand their approach to problem-solving and teamwork.
Customized interview questions: Moving away from standardized coding questions and incorporating real-world scenarios specific to the company’s needs.
As AI continues to evolve, companies must remain vigilant in adapting their hiring practices. The tech industry thrives on innovation, and finding authentic talent will require equally innovative recruitment strategies.
As more people use web apps every day, it’s important for companies to make sure their apps can handle the growth. Scaling an app means making it able to handle more users, data, and traffic as the app gets bigger.
In this article, we’ll look at how real companies like Facebook, Netflix, and others handle the challenges of scaling their web apps. By learning from them, you can apply these strategies to your own projects, whether it’s a small app or a big platform.
Make Sure Your App Runs Properly From the Start
Before an app gets really popular, it’s important to make sure it runs properly. Facebook, for example, built its platform to load quickly and handle millions of users without crashing. Instagram did the same thing by creating a system that could handle more traffic as it grew. Start by making sure your app runs fast. Use things like caching and load balancing to help it handle more people without slowing down.
As your app grows, it can become hard to manage. That’s why many companies break their app into smaller pieces called micro-services. Companies like Netflix and Uber do this to make sure each part of their app can grow on its own.
For example, Netflix uses micro-services for things like video streaming and recommending shows. This way, they can make one part of their app faster without affecting the rest of it. Try using micro-services to break your app into smaller parts that can grow on their own when needed.
Use Cloud Services to Scale
Many companies, like Spotify and Airbnb, use cloud services to scale their apps. Cloud services let them rent computer power and storage, instead of buying expensive equipment. This makes it easier to handle more users without spending a lot of money upfront.
For example, Spotify uses the cloud to store millions of songs, and Airbnb uses the cloud to manage bookings from around the world.
Use cloud services (like AWS or Microsoft Azure) to make your app flexible and easier to scale without needing to invest in a lot of physical equipment.
Speed Up Your App With Caching and CDNs
Caching is when you store data temporarily to make it load faster the next time it’s needed. Many companies use caching and content delivery networks (CDNs) to speed up their apps. Reddit, for example, uses caching to handle huge amounts of traffic. Amazon uses CDNs to deliver things like product images quickly to customers. Use caching and CDNs to make your app faster and reduce the strain on your servers.
Add more servers to handle more users & manage data efficiently
When your app grows, you might need more servers to handle all the users. This is called horizontal scaling. Twitter and Pinterest have done this by adding more servers to spread the work across them.
For example, Twitter broke its app into smaller parts and added more servers to handle more traffic. Pinterest does the same to make sure everything runs smoothly. Add more servers to spread out the work and make sure no single server gets overloaded.
As apps grow, so does the amount of data they need to store. Google and LinkedIn created special systems to manage all their data. They use techniques like data sharding, which splits data into smaller pieces that are stored in different places. Focus on organizing your data well by breaking it into smaller parts that are easy to manage, even as your app grows.
Keep Monitoring and Improving
Scaling an app is a long-term process. Companies like Slack and Shopify constantly monitor their apps to make sure everything is working well. They use tools to track performance and test their systems to catch problems early. Regularly check how your app is doing and make improvements to keep things running smoothly as it grows.
Scaling web apps can be challenging, but it’s also very rewarding. By learning from how companies like Facebook, Netflix, and Google handle scaling, you can build an app that grows with your users. Focus on making your app run fast, break it into smaller parts, use cloud services, and keep an eye on performance.
Scaling is something that takes time and constant attention. With the right strategies, you can create an app that keeps working well as it gets bigger.
The field of quantum computing has witnessed rapid advancements in recent years, promising breakthroughs in areas such as cryptography, material science, and artificial intelligence. Among the many approaches to quantum computing, one particularly intriguing avenue is the use of Majorana fermions. These exotic particles, predicted by physicist Ettore Majorana in 1937, offer a promising route to stable and fault-tolerant quantum computation. However, they are not the only contenders in the race for quantum supremacy. Several other technologies, including superconducting qubits, trapped ions, and photonic quantum computing, are competing to become the leading platform for the quantum revolution.
Majorana Fermions and Their Role in Quantum Computing
Majorana fermions are unique in that they are their own antiparticles. This property allows them to be used as topological qubits, which are inherently more stable than traditional qubit designs. In conventional quantum computing approaches, qubits are highly susceptible to environmental noise, which leads to errors in computation. Majorana-based qubits, on the other hand, leverage topological protection, making them more resistant to decoherence and error-prone operations.
Researchers have been working on engineering Majorana fermions in condensed matter systems, such as semiconductor-superconductor hybrid structures. In 2018, Microsoft-backed researchers reported experimental evidence for Majorana fermions in nanowires, sparking interest in their potential for practical quantum computing. However, challenges remain, including the need for precise control over these particles and reliable methods for performing logical operations with them.
Competing Quantum Computing Technologies
Despite the promise of Majorana fermions, other quantum computing platforms have made significant strides. The main competing technologies include:
Superconducting Qubits
Used by Google, IBM, and Rigetti, superconducting qubits rely on Josephson junctions to create and manipulate quantum states. Google’s Sycamore processor demonstrated quantum supremacy in 2019 by performing a computation that would take classical supercomputers thousands of years. The main challenge is the need for extreme cooling and error correction mechanisms to maintain qubit coherence.
Trapped Ions
Companies like IonQ and Honeywell are pioneering quantum computers based on individual ions trapped by electromagnetic fields. Trapped ion systems offer long coherence times and high-fidelity gate operations. However, scaling up these systems remains a challenge due to the complexity of controlling many ions simultaneously.
Photonic Quantum Computing
This approach leverages the quantum properties of photons to perform computations. Companies like Xanadu are developing photonic quantum processors that operate at room temperature, unlike superconducting qubits. The difficulty lies in creating scalable entanglement and fault-tolerant error correction schemes.
Neutral Atom Quantum Computing
This emerging field uses arrays of neutral atoms manipulated with laser beams to perform quantum operations. Companies like Atom Computing and Pasqal are exploring this approach, which promises scalability and long coherence times.
The Future of Quantum Computing
While Majorana fermions present a compelling case for robust quantum computing, they are still in the early experimental stage. Meanwhile, superconducting qubits and trapped ions are already demonstrating commercial viability, with cloud-based quantum computing services becoming increasingly available. Photonic and neutral atom approaches also hold promise for future scalability and efficiency.
Ultimately, the quantum computing race is far from settled. The winner may not be a single technology but a combination of different approaches tailored for specific applications. As researchers continue to push the boundaries of quantum mechanics, we can expect further breakthroughs that will shape the future of computation and redefine the limits of what is possible in the digital age.
Laravel’s Service Container makes coding easier by automatically handling dependencies. Instead of manually creating objects and passing them around, Laravel does it for you. This helps keep your code clean, reusable, and easy to update.In this article, we’ll look at how the Service Container works, why it’s useful, and some common mistakes developers make—like using the Factory Pattern when they don’t need to.
Service Container
The Service Container is a fundamental piece of what makes Laravel easy to code with. You could think of the Service Container as a delivery truck that has every tool you need.The Laravel Service Container is essentially a central database of objects. It allows for objects to be re-used in different parts of your web app.
[crayon-687accedddde9184889556/]
If you’re coding in Laravel, you will need to know how to work with the service container.
Dependency Injection
One of the great things of the service container is it allows for dependency injection, which you could think of as the delivery truck driver being able to read your mind and bring you everything you were thinking of.When a method is called, the service container will automatically pass or “inject” the implementation as an argument.Here’s an example of a class with a method we want to call:
[crayon-687acceddddf3358314052/]
Without dependency injection, we call doSomething this way:
[crayon-687acceddddf6865603819/]
With dependency injection, we can call the same method easier:
[crayon-687acceddddf8255719346/]
Although the second example has more code, the idea is that the binding is reused when another method is expecting the same type (reducing the amount of code overall). Another advantage is it makes the code more maintainable because if you want to switch to another implementation, all you have to do is update the binding in the service provider:
[crayon-687acceddddfa254499552/]
There are other things that you can do, such as adding singleton or scoped instances. More information is located in theLaravel documentation.
Factory Pattern
The service container also provides the factory pattern. The factory pattern allows you to specify how an object is created (using a callback):
[crayon-687acceddddfc248156082/]
Then we can get an instance of “SomeInterface” later on in the code:
[crayon-687acceddddfe309769687/]
Problem & Solution
The problem is when programmers reinvent the wheel by using the factory pattern to do what dependency injection would be doing already:
[crayon-687acceddde00286898742/]
There’s a couple problems with the above:
The abstract EncryptionAlgorithm doesn’t need to be bound to a factory callback. If the implementation for SettingRepository did change, that would make the factory binding irrelevant.
The EloquentSettingRepository implementation is bound to SettingRepository so we should at least be using the service container to make SettingRepository.
Most importantly, this breaks dependency injection. There maybe a time when you would need to do this, but that would be very limited.Instead, it’s best to let Laravel do it’s magic and build the object for us:
[crayon-687acceddde02827852925/]
There’s no more factory for “EncryptionAlgorithm” because that’s the magic of Laravel. Work smarter, not harder!
Web development is evolving faster than ever, with new technologies and tools reshaping how we build and optimize today's web applications. As we step into 2025, let’s explore the most significant trends, advancements in JavaScript frameworks, and predictions for the future of web development.
AI-Powered Development: A Game Changer
Artificial Intelligence (AI) is revolutionizing the way developers write, debug, and optimize code. Tools like GitHub Copilot, ChatGPT Code Interpreter, and Tabnine are enhancing productivity by generating boilerplate code, suggesting fixes, and even writing entire functions. It's also being used to auto-generate UI components and improve accessibility. Frameworks like Tailwind CSS and Material UI are integrating AI for better design recommendations. Lastly (but not finally), AI-driven testing tools are predicting possible failure points, auto-generating test cases, and improving test coverage, reducing overall manual effort. We will see AI's further integration into IDEs, making web development more intuitive and reducing the need for repetitive coding tasks.
WebAssembly (WASM): Expanding Beyond JavaScript
WebAssembly (WASM) is allowing developers to run high-performance code in the browser, opening up new possibilities for web apps. It enables languages like Rust, Go, and C++ to run in the browser with near-native performance. This improves gaming, video editing, and real-time collaboration tools on the web, as well as having faster execution for compute-intensive applications, such as AI models running in the browser.
Figma & Adobe Photoshop Web are good examples of modern web apps using WebAssembly to deliver high-performance experiences directly in the browser. This is also giving way to Web-Based Game Engines.
Edge Computing & Serverless Architectures
With the growing demand for speed and efficiency, developers are shifting toward Edge Computing and Serverless Architectures for faster response times. Platforms like Cloudflare Workers, Vercel Edge Functions, and AWS Lambda@Edge are reducing latency by executing code closer to users. Developers are decentralizing hosting services and leveraging platforms like Supabase and Firebase to eliminate backend complexity. Serverless and Edge Computing will become the default for handling real-time interactions, API calls, and content delivery.
New Features in HTML, CSS, and JavaScript
Among the most recent updates for HTML we can find the <dialog> element improvement with better support for modals.
Container Queries are making responsive design more flexible without media queries.
Declarative Shadow DOM is also a game-changer for web component adoption.
As for CSS, the :has()selector has finally arrived as a parent selector!. Also Subgrid is improving CSS Grid layout control.
And you can now find new color functions like: color-mix(), relative color syntax, and light-dark() for better theme handling.
Javascript is also seeing some improvements with Temporal API, which is a better way to handle dates and times. The Pipeline Operator (|>), which simplifies function composition. Also improvements in modularization for Web Workers are signaling that JavaScript will continue to evolve, with native browser APIs replacing more third-party libraries.
Expect lighter, faster frameworks with built-in support for server-side rendering, hydration, and progressive enhancement. Several frameworks and tools are leading the next wave of innovation in 2025, such as:
Next.js 15 – Improved React Server Components and TurboPack for faster builds.
Bun 1.0 – A JavaScript runtime competing with Node.js, offering faster execution and better native APIs.
Deno – Growing in popularity for secure, modern JavaScript applications.
Qwik & SolidJS – Pushing boundaries with instant-loading JavaScript apps.
The future of web development in 2025 is exciting and full of possibilities. With AI-driven coding, high-performance WebAssembly applications, and the rise of Edge Computing, developers have more tools than ever to build fast, efficient, and scalable applications. Staying ahead of these trends will be key to remaining competitive in the evolving web landscape.
In web development, time is precious. As developers often say, "Don't reinvent the wheel." Instead, use existing tools and libraries to speed up your work. Leveraging UI component libraries allows you to focus on what makes your app unique while ensuring a consistent and polished interface.
A well-designed UI enhances the user experience, boosts usability, and ensures consistency across your application. One critical aspect of UI design is layout, which dictates how elements are arranged on the screen. A good layout improves navigation, readability, and overall user satisfaction.
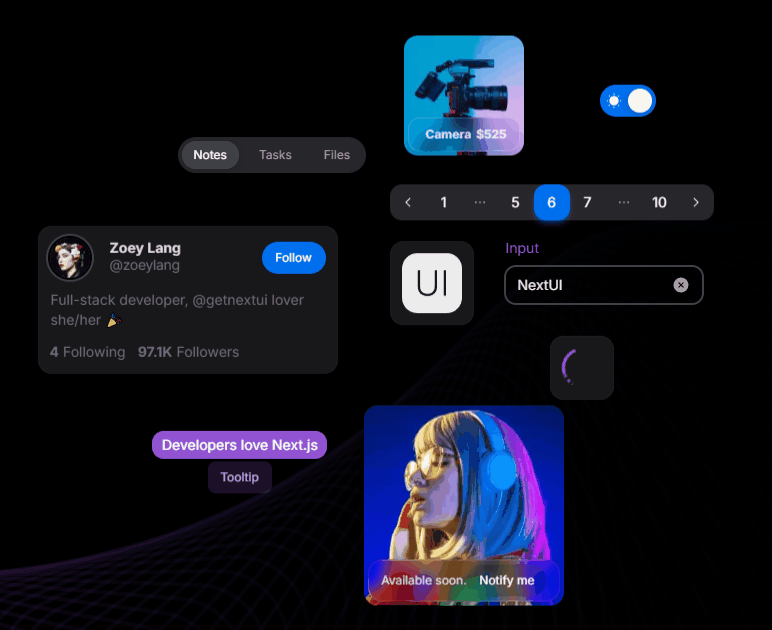
In this post, we'll explore some of the most popular UI libraries for React: Material UI (MUI), Next UI, WindUI, Tailwind UI, and React-Bootstrap. We’ll look into their pros and cons, specifically focusing on how they handle layout, to help you make an informed decision for your next project.
Material UI (MUI) is one of the most widely used UI libraries, based on Google's Material Design guidelines. It offers a vast array of pre-styled components like buttons, cards, grids, and typography. It’s highly customizable, allowing you to adjust themes and styles to match your brand.
Pros:
Consistency: Adheres to Material Design principles for a polished look.
Customizable: Extensive theming options for colors, typography, and layout.
Comprehensive Components: Wide range of components suitable for complex projects.
Powerful Layout System: Provides a robust Grid system and layout components to create responsive designs.
Active Community: Regular updates and thorough documentation.
Challenges:
Learning Curve: Might be overwhelming due to extensive customization options.
Bundle Size: Can increase your project's size, affecting performance if not optimized.
Opinionated Design: Material Design may not fit all project aesthetics, requiring extra customization.
Example:
[crayon-687accedde626017911898/]
In this example, we create a card with an image, text, and a button using MUI's Card component.
Next UI is a modern, lightweight library focused on simplicity and performance. It offers an elegant design system ideal for building responsive, sleek UIs without sacrificing speed.
Pros:
WindUI is built on Tailwind CSS, enabling the creation of fast and highly customizable UIs. It combines Tailwind's utility-first approach with pre-built components for flexibility and ease of use.
Pros:
Flexible Styling: Leverages Tailwind's utility classes for granular control.
Tailwind UI enhances Tailwind CSS by offering a collection of professionally designed, responsive components. It allows you to quickly integrate high-quality UI elements into your project.
Pros:
Professional Design: Offers polished, ready-to-use components.
Customization Flexibility: Tailwind's utility classes make styling straightforward.
Responsive Out of the Box: Components are designed with responsive layouts in mind.
DaisyUI is built on top of Tailwind CSS, offering a collection of customizable, accessible components that follow modern design principles. It allows developers to quickly create responsive interfaces while leveraging the full power of Tailwind CSS.
Pros:
Ready-to-Use Components: Comes with pre-built, styled components, making it easier to set up UIs quickly.
Customizable:Since it's built on Tailwind CSS, components can be customized using utility classes. And more control on you own created components
Accessible: Provides accessibility features out-of-the-box, following best practices for web accessibility.
Mobile-First: Components are designed to be responsive, making them ideal for mobile-first development.
Utility Class Friendly: You can extend or override styles with Tailwind utility classes easily.
Challenges:
Tailwind Dependency: Requires knowledge of Tailwind CSS to fully utilize the framework.
Design Constraints: Although customizable, it may feel limiting compared to designing components from scratch using Tailwind.
Learning Curve: Beginners may need time to familiarize themselves with both Tailwind and DaisyUI. And you will need to take control of the javascript part (making some of the component functional with React)
Example:
[crayon-687accedde636808357322/]
Tailwind CSS Tools - A Perfect Match for Custom Components
If you're already familiar with Tailwind CSS, tools like Tailwind UI and DaisyUI can be excellent additions to your workflow. They offer pre-designed components that you can fully control and modify to match your project needs. Since both are based on Tailwind, you can easily extend or modify the components, giving you the power to create abstracted and reusable UI elements without losing control over the design and behavior since you will need to create the components yourself.
Layout is a critical component of UI design, affecting how users interact with your application. Each library offers different tools and approaches to layout:
Material UI: Provides a powerful Grid system and numerous layout components, ideal for complex, responsive designs.
Next UI: Offers basic layout components suitable for simpler layouts in modern applications.
WindUI and Tailwind UI: Leverage Tailwind CSS utilities for granular layout control, allowing highly customized and responsive designs.
DaisyUI: Built on top of Tailwind CSS, DaisyUI simplifies development with pre-built components and accessibility features, making it a strong choice for quickly building responsive and accessible UIs.
React-Bootstrap: Uses Bootstrap's well-known Grid system, making layout design straightforward but potentially less modern in appearance.
Remember, there's no need to reinvent the wheel when these powerful libraries can provide a solid foundation for your application's UI and layout needs. Evaluate the pros and cons in the context of your project's requirements to choose the most fitting library. Happy coding!
When it comes to building reliable software, testing is essential. Some might think tests are a waste of time, but let’s be real—would you drive a car that’s never been tested by the manufacturer? I didn’t think so!
Two common types of tests in software are unit tests and integration tests. But what’s the difference? Let’s break it down with an easy comparison.
Unit Testing: The Wheels
Think of unit tests as inspecting the individual parts of a car. For example, you might check just one wheel to make sure it’s round, sturdy, and spins correctly. In coding, unit tests focus on small, isolated pieces of your code—like functions or methods—to make sure they work properly on their own.
Why is this important? Well, even if 99% of your car is working, if one wheel is faulty, the whole car won’t drive smoothly (or at all). The same goes for code: if one function breaks, it could cause bigger problems down the line.
Integration Testing: The Whole Car
Now, imagine testing all four wheels once they’re attached to the car. Integration tests do exactly that—they check if different parts of your code work well together. Even if each wheel passed its individual test, there’s no guarantee they’ll function correctly when combined with the rest of the car.
In software, integration tests ensure that different modules or components of your application play nicely together. This is important because even well-written individual pieces of code can still cause errors when they interact in unexpected ways.
What Makes a Good Test?
When writing tests, there are a few essential characteristics to keep in mind. A good test should be:
Readable: Easy to understand at a glance.
Writable: Simple to create and maintain.
Reliable: Consistent results, no false positives.
Fast: Shouldn’t slow down your development process.
Mostly Unit Tests: Focus on testing small, isolated parts of your code.
The last point follow the simple idea: if you test all the small pieces (unit tests), everything should work well when those pieces come together (integration tests).
The AAA Pattern: Arrange, Act, Assert
One of the simplest and most effective approaches, to write unit test is the AAA pattern—which stands for Arrange, Act, and Assert. This pattern keeps your tests clean, organized, and easy to understand.
Arrange: Prepare the data, objects, or conditions needed for the test.
Act: Execute the function or code that you want to test.
Assert: Verify the result by checking if the outcome matches what you expect.
Step 1: Arrange
Let’s start with Arrange, the first step of the AAA pattern. This is where we set up the initial state before running our test. It’s often referred to as setting up the subject under test (SUT), which is the piece of code that will be tested. In this step, we typically initialize variables, import necessary modules, and prepare the environment.
For example:
// Arrangeconst message1 = "Hello World";
Here, we’re preparing message1 as input for the function we want to test. The Arrange step ensures everything is ready without actually running the test logic.
Step 2: Act
Next, we move on to Act, where we apply actions or stimuli to the SUT. This could involve calling methods, simulating user interactions, or triggering events.
// Actconst message2 = message1.trim();
In this case, we are trimming the value of the message1 variable. The Act step is all about executing the behavior that we want to test.
Step 3: Assert
The final step in the AAA pattern is Assert. Here, we observe and verify the results by checking if the outcome matches our expectations.
In Jest, we typically use functions like expect() and toBe() to compare the actual result with the expected one.
// Assertexpect(message2).toBe("Hello World");
In this case, we’re asserting that message2 is exactly what we expected: "Hello World". If the result matches, the test will pass; if not, it will fail, indicating that something went wrong.
Getting Started with Jest
Before we dive into Jest, it’s worth mentioning that all the examples we’ll cover are available on Codesandbox.io a great tool for quickly testing and experimenting with code online.
Jest is a JavaScript testing framework that makes it simple to write and run tests. With features like mocking, code coverage, and easy-to-read results, Jest is designed to help you write efficient and reliable tests.
In this post, we'll be focusing on unit testing, since, as we mentioned earlier, most tests in programming are unit tests. Unit tests play a crucial role in ensuring that individual components or functions in your code work as expected. They're the foundation of a solid testing strategy, allowing us to catch issues early and maintain the quality of our codebase.
Jest - expect - toBe
In Jest, the expect function is used to make assertions. It’s like saying, “I expect this value to be something specific.” You can pair expect with various matchers, and one of the most commonly used matchers is toBe.
The toBe matcher checks if the result of an expression matches the expected value, similar to the strict equality operator (===) in JavaScript. For example:
expect(1 + 1).toBe(2); This assertion will pass because 1 + 1 equals 2.
expect(1 + 1 + 1).toBe(2);: This assertion will fail because 1 + 1 + 1 equals 3, not 2.
You can find a full list of matchers in the Jest Expect Documentation. Don’t worry if this seems a bit overwhelming at first—most of these functions do the same thing but in different scenarios or with diferents types of variables.
The test() function in Jest is used to define individual test cases. It takes two arguments:
1. Test Name: A string describing what the test is checking. This helps identify the purpose of the test and makes the output more readable.
2. Test Function: A function that contains the actual test logic, including any assertions you want to make.
"expect-to-be": This is the name of the test. It describes that you’re testing the expect function with the toBe matcher.
Test Function: Inside the function, you’re using expect() with toBe() to compare values. The first assertion will pass because 1 + 1 equals 2, but the second one will fail because 1 + 1 + 1 equals 3, not 2.
Naming Your Test Files
When working with Jest, it’s a good practice to name your test files in a way that clearly indicates their purpose. Typically, the name of the test file should mirror the name of the file containing the code you’re testing, but with a .test.js extension. This way, Jest can automatically detect your test files and run them.
Some developers prefer to use .spec.js instead of .test.js. The reason behind this is that “spec” stands for “specification” and reflects what they expect the code to do. In both cases, the purpose is the same: to clearly indicate that the file contains tests.
Additionally, it’s common practice to organize tests in a separate folder, often called /tests, that mirrors your source code folder structure.
In CodeSandbox, you’ll find the examples we’re working with organized in a simple, clear structure like the one shown below:
In this structure, we have several JavaScript files, each containing a function or piece of logic to be tested, along with corresponding test files. The test files follow the .test.js naming convention to ensure Jest can easily recognize them.
Here’s a breakdown of the file organization:
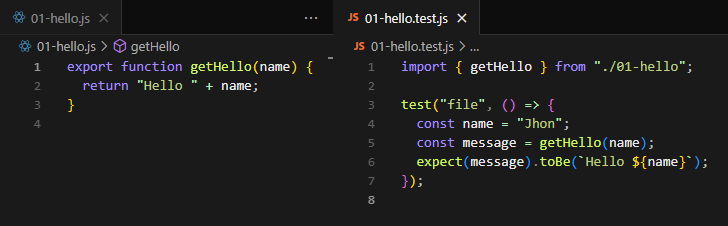
01-hello.js: Contains a function, getHello(), that returns a greeting.
01-hello.test.js: The test file for 01-hello.js, where we test the getHello() function.
02-obj.js and 02-obj.test.js: Similar structure, where we have code and its corresponding test for an object-based function.
03-arr.js and 03-arr.test.js: Tests for an array-based function.
Additionally, the index.test.js file contains extra examples of various test cases that demonstrate how to work with Jest and expect functions. This file includes general examples that can help you understand how to set up and execute tests for different scenarios.
Exporting and Importing Files
As you can see in the image, files should be properly exported and imported. In the example:
The getHello function is exported from 01-hello.js.
In 01-hello.test.js, we import the getHello function using import { getHello } from "./01-hello";.
Jest literally reads the lines of code from the file being tested, so it’s essential to properly import the functions or modules that you want to test.
In this example, the test file correctly imports getHello and runs a simple test using expect() and toBe() to check if the function returns the expected string.
Conclusion
Testing is essential for building reliable software, and Jest makes it easier to write, organize, and run both unit tests and integration tests. While unit tests focus on small, isolated pieces of code, ensuring they work as expected, integration tests ensure these pieces interact correctly when combined.
Jest provides powerful tools for both testing levels. We've focused on unit tests here, but Jest is equally effective for integration tests. By applying practices like the AAA pattern (Arrange, Act, Assert) and organizing your test files properly, you can maintain clean, reliable code, ensuring everything from small functions to larger system interactions works smoothly.
In future posts, we'll explore testing React applications using Jest to ensure the UI behaves as expected. With these basics in hand, you're ready to dive deeper into Jest's advanced features. Happy testing!
In the world of web development, creating a consistent design across various platforms and teams can be quite challenging. Imagine trying to keep the same colors, fonts, and spacing across all the different parts of your application. This is where design tokens come to the rescue.
Design tokens are like building blocks for your design system. They store values for design elements such as colors, spacing, and typography in a single, centralized place. Think of them as a way to keep all your design choices organized and easily accessible. By using design tokens, you can ensure that your design remains consistent and easy to manage, no matter how large your project grows.
In this post, we'll explore what design tokens are, why they're useful, and how you can use them with Tailwind CSS to create a cohesive and maintainable design system.
What are Design Tokens?
Design tokens are the essential building blocks of a design system. They are values that represent design decisions and help in maintaining a consistent look and feel throughout your application. These tokens can include:
Colors: Specific shades and tints used in the application.
Spacing: Values for margins, padding, and gaps.
Typography: Font sizes, weights, and styles.
Think of design tokens as named variables that store these values. Instead of hardcoding colors or sizes directly into your styles, you reference these tokens. This makes it easier to update and maintain your design because a change in the token is reflected everywhere it’s used.
For example, you might have a color token for your primary brand color:
[crayon-687acceddf2bd980664260/]
When you use this token in your styles, you refer to it as primary instead of #1a202c. This abstraction allows you to change #1a202c to a different color in one place, and that change will automatically apply across your entire project.
Benefits of Design Tokens
Consistency: Ensures that the same values are used across all parts of the application, maintaining a unified look and feel.
Scalability: Makes it easy to scale your design system as your project grows and evolves.
Maintainability: Simplifies updates and changes. For example, changing a color value in the token file will update all instances where it’s used.
Collaboration: Provides a common language for designers and developers, improving teamwork and communication.
Design tokens are a powerful tool to help bridge the gap between design and development, making it easier to build and maintain consistent, scalable, and flexible design systems.
Tools for Managing Design Tokens
One popular tool for managing design tokens is Tokens Studio for Figma. It allows you to:
Create Reusable Tokens: Define tokens for colors, typography, spacing, and other design elements.
Sync with External Sources: Connect tokens to external sources like GitHub to keep them up-to-date.
Semantic Tokens: Create meaningful tokens that reflect your design decisions.
This tool enhances collaboration between designers and developers by ensuring everyone uses the same design standards.
Implementing Design Tokens in Tailwind CSS
Integrating design tokens into Tailwind CSS can help maintain a consistent design system and simplify the management of design updates. Tailwind CSS, a utility-first CSS framework, allows you to use predefined classes to style your application. By integrating design tokens, you ensure that your design remains uniform and easy to manage. Tailwind comes already with predefined design tokens with a lot of variations. In this example we will define the variations our self to give a better example or when you need something diffrent then the defaults of tailwind css.
Step 1: Define Your Tokens
First, create a design tokens file (e.g., tokens.json) that contains all your design tokens.
Example tokens.json:
[crayon-687acceddf2c5706969656/]
Step 2: Configure Tailwind to Use Tokens
Next, modify the Tailwind configuration file (tailwind.config.js) to include these tokens. This setup ensures that Tailwind CSS uses the values defined in your tokens file.
Example tailwind.config.js:
[crayon-687acceddf2ca170674833/]
Step 3: Use Tokens in Your Styles
With your tokens defined and configured in Tailwind CSS, you can now use them in your HTML by referring to the corresponding Tailwind utility classes.
Example HTML:
[crayon-687acceddf2cd264662463/]
In this example:
bg-primary applies the primary color as the background color.
text-large sets the font size to large.
p-medium adds medium padding.
Benefits of Using Tokens with Tailwind CSS
Consistency: Ensures uniform design across all components.
Scalability: Easy to update and extend the design system as the project grows.
Maintainability: Changes to tokens are reflected globally, making updates straightforward.
Efficiency: Enhances collaboration between designers and developers by using a common set of design values.
Conclusion
Implementing design tokens in Tailwind CSS is a powerful way to achieve a cohesive and efficient design system. By defining tokens in a central file and configuring Tailwind to use them, you ensure that your design remains consistent, scalable, and easy to maintain. Start incorporating design tokens into your Tailwind CSS projects today to streamline your workflow and improve your design system.


 The future of web development in 2025 is exciting and full of possibilities. With AI-driven coding, high-performance WebAssembly applications, and the rise of Edge Computing, developers have more tools than ever to build fast, efficient, and scalable applications. Staying ahead of these trends will be key to remaining competitive in the evolving web landscape.
 In this example, we create a card with an image, text, and a button using MUI's Card component.
 Next UI is a modern, lightweight library focused on simplicity and performance. It offers an elegant design system ideal for building responsive, sleek UIs without sacrificing speed.
Pros:
Next UI is a modern, lightweight library focused on simplicity and performance. It offers an elegant design system ideal for building responsive, sleek UIs without sacrificing speed.
Pros:
 You can run this example
 Pros:
Pros:
 Using Tailwind's utility classes, you have fine-grained control over the layout.
 Pros:
Pros:

 Pros:
Pros:
 Tailwind CSS Tools - A Perfect Match for Custom Components
If you're already familiar with Tailwind CSS, tools like Tailwind UI and DaisyUI can be excellent additions to your workflow. They offer pre-designed components that you can fully control and modify to match your project needs. Since both are based on Tailwind, you can easily extend or modify the components, giving you the power to create abstracted and reusable UI elements without losing control over the design and behavior since you will need to create the components yourself.
Tailwind CSS Tools - A Perfect Match for Custom Components
If you're already familiar with Tailwind CSS, tools like Tailwind UI and DaisyUI can be excellent additions to your workflow. They offer pre-designed components that you can fully control and modify to match your project needs. Since both are based on Tailwind, you can easily extend or modify the components, giving you the power to create abstracted and reusable UI elements without losing control over the design and behavior since you will need to create the components yourself.
 Pros:
Pros:
 React-Bootstrap's Grid system allows for quick and easy layout creation.
 Why is this important? Well, even if 99% of your car is working, if one wheel is faulty, the whole car won’t drive smoothly (or at all). The same goes for code: if one function breaks, it could cause bigger problems down the line.
 In software, integration tests ensure that different modules or components of your application play nicely together. This is important because even well-written individual pieces of code can still cause errors when they interact in unexpected ways.